Since now you know I’m lazy when it comes to drying laundry outside and how I picked up the idea of inside laundry line from a previous home exchange our family did, I want to show you how easy it is to install an inside laundry line in your home.
Most hardware stores, big and small, have these supplies. The wire needed for this project is sold on large spools and is cut to the size you need by a store employee. Have the wire cut slightly longer than your measurements (perhaps by 10% or so) and then you can cut it more precisely at home while doing this project. You need a little extra wire, as you’ll read in the instructions, to get around your turnbuckles and screw eyes – oh my!
How to Install an Inside Laundry Line
Materials needed:
- hammer – to hammer in your screw eyes to get them started twisting
- screw driver – to stick into the screw eye hole to help screw it into your wood
- wire cutter – to trim your wire to the right length
- tape measure and pencil for marking
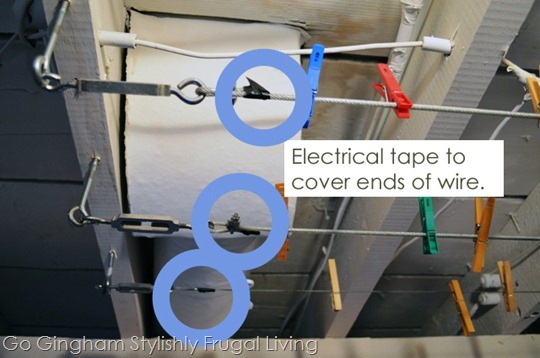
- electrical tape – to cover the sharp ends of the wire with (you can buy something for this purpose but tape works fine.)
- screw eyes – to screw into the wood and attach your wire to
- wire – long enough to cover your length plus extra for getting to the turnbuckle
- turnbuckles – to tighten your wire so it doesn’t sag
These are pretty easy to follow and you’ll get the idea from my very busy pictures below. It helps to lay the wire out on the floor and visualize how it works together before you start cutting. Measure twice, cut once is good advice for sewers as well as laundry line installers!
Instructions:
- Measure your area and mark with a pencil where your screw eyes should be placed.
- First, place your screw eyes in the wood, using the hammer, pound them a few times to get them started in the wood.
- Next, put the screw driver in the eye hole and turn it/wind it into the wood. The screw driver is easier to grip than just the screw eye.
- Add your turnbuckle to the screw eye and figure out how long to cut your wire.
- Take apart the turnbuckle (it unscrews) and attach your long piece of wire.
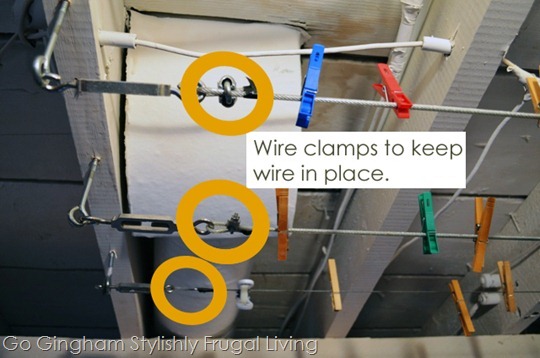
- Clamp your wire end to the turnbuckle end.
- Screw the turnbuckle back together and adjust the tension so it’s not too tight or sagging.
- Finish by covering the ends of the wire with electrical tape so they don’t snag your clothing.
While my line is installed in our basement, it could work in a garage as well. Our home exchange family had theirs in a very small porch area, in front of their washing machine. I wish I had thought to take measurements of their space but I didn’t. It could also work on a much smaller area. If your laundry area walls are finished, make sure you’re attaching your screw eyes into a stud so that they don’t tear apart your drywall.
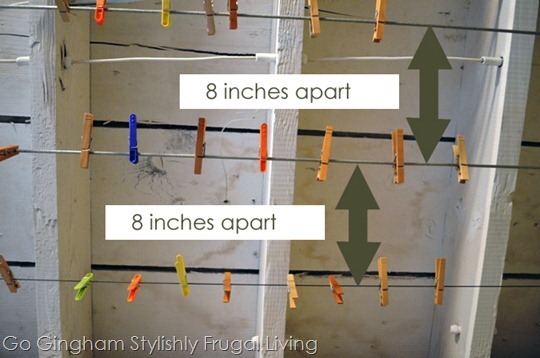
I have 3 separate lines that are 14 feet long and are about 8 inches apart.
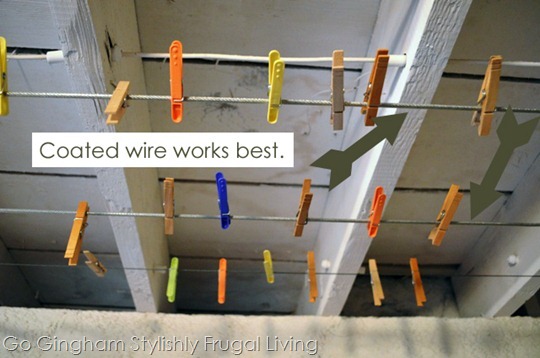
I like the wires that are coated (it’s either plastic or vinyl? I’m not sure which but they’re thicker) rather than the smaller, more narrow lines.
When you buy the wire, make sure it’s longer than the space you want to add lines to. You have to add room for the turnbuckles and the wire clamps.
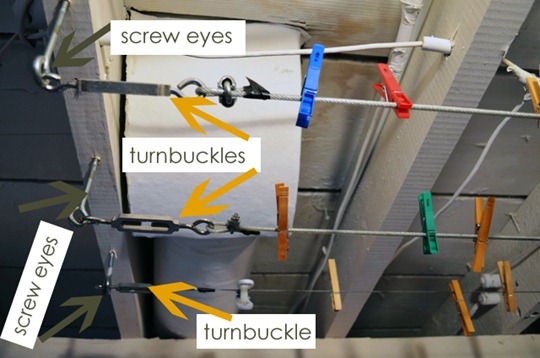
Wire clamps keep the wire in place. They’re available in either screw on type or hammer on type, depending on your store and your wire.
When you’re done, don’t forget to add electrical tape so that the sharp ends of the wire don’t snag your clean laundry.
This project required a small step stool – our basement ceiling is not very high, which is good since we’re not very tall! I did this project with help from my son when he was 11-years-old (thanks, sweetie!) and it really helps to have 2 people on the job. If you live alone, why not find a friend and each help one another on this project?
Next up, I’ll share my techniques for maximizing the inside laundry line drying space.
Do you have a laundry line drying system? Do you live in a house with a basement?
Go Gingham related links:
Laundry chute evolution and the re-purposed door we found
Our fun adventure to find a claw foot for our claw foot tub – it was missing a foot – and we traded!
DIY project redoing the missing claw foot
Gingham shelf liners I made for our bathroom – yes, gingham
Grommets and shower curtains – easier than sewing button holes!
Bathtub in old bathrooms – shower curtain holder
This is exactly what I want installed in the basement at the farm. It looks neat and tidy and well-installed. I find it hard to trek heavy baskets of wet clothes up the stairs and outside, but love having the ease of hanging things up right in the laundry room.
LikeLike
Heidi, I’m so glad! And I agree that having the lines right there makes it super easy to hang the clothing. I do use my satellite drying space from time to time – our dining room chairs. They just had a set of sheets and towels “finishing up” on them last night/this morning – meaning my laundry lines were so full that I needed a little additional space to let them dry all the way. I don’t like to go that route because the house can get filled with temporary items pretty quickly. Soaking pots and pan, stinky soccer socks, etc. that are all temporarily there!! Thanks, Heidi.
LikeLike
Those pictures look amazing!
LikeLike
Thanks, Mary! I think they’re a little busy with all of the added graphics but they do get the point across 🙂 You could install some lines for drying all those snowy items, Mrs. Alaska.
LikeLike
Love the detailed photos and names of all the gizmos. You can also install a set of eye screws at midpoint and thread the wire through for support if you have a super long span. You can adjust the length of eye screws you use to get the line at a comfortable height for hanging – easy overhead reach, but high enough for long things, like beach towels.
Sara, thanks for your encouragement for hanging freshly laundered towels – I’m trying it today! For some reason, I had used the line to dry towels from the pool or beach until I washed them, but never clean ones!
LikeLike
Michelle, that is an excellent point – the midway screw eye! I do have one of those but we ran out so the other two lines get a little saggy when filled with laundry – like they are right now.
You are so welcome for the encouragement and thank you for reading and leaving so many good comments!
I know that I get stuck in my same routines and will read something and think, “why didn’t I think of that?” or that I should try something a different way. I used to not use our electric slow-cooker during the summer because it heated up our kitchen too much but our friends gave me the idea of using it on the covered porch. I thought that was brilliant. I’m using my slow-cooker today in the heat – but it’s on my little side porch – heating up the outside while cooking beans!
Thanks, Michelle.
LikeLike
I remember hanging clothes outside — in the winter frozen laundry was a lot of fun to drag into the basement and hang it up. We use clothes racks and hangers in the basement. And for those really drippy things, we have a metal rod in the shower area. That works quite well.
I still miss the clothes line outside on those hot summer days — great for drying kitchen towels and airing out blankets, rugs, jackets, etc. Maybe one day I will have the posts repaired and clothes lines rehung.
As for cooking outside. In our old house the single burner (which you can buy in most stores) kept blowing our fuses. We found an old popcorn popper — the type that had a separate heating element section and the popper pot sat on top of it. Well the popper pot burned out years ago, but we kept the heating element section. So now we can use it with the tea kettle and small pots to cook outside. Works great!
LikeLike
Sue, good idea hanging the drippy items over a metal rod in the shower. I can picture the frozen laundry being brought in from a hanging line outside. I’m sure it was stiff at first! Was it more wrinkled or less when it dried?
I really like how you used and item that no longer worked in a new way. Very smart. Having alternative places for cooking is a good idea, especially outside of the kitchen.
Thanks for leaving a comment. As a regular commenter here, I look forward to (and appreciate) your perspective and ideas. Thank you.
LikeLike
I admire your handiness, but that looks like a lot o unnecesary trouble. I just put stuff on hangers & hang it on the curtain rod of a sunny window.
LikeLike
Hey Sara,
It’s cold & overcast in NC on the coast!
Thanks to reading “GO GINGHAM” to save on my drying bill this past year I have started drying laundry in the garage( on bad weather days), on drying racks (2)& a closet bar I purchased from $ general for very little. I use 2 fans on the laundry to dry & soften the fabrics( towels) even with a vinager rince it helps to fluff the towels. I just LOVE the sent of the loads drying using your recipe for my homemade laundry detergent! It’s just me so between the closet rack & 2 drying racks I can do all the laundry. I hang the sheets over the racks & flip after a few hrs. to dry the other side. It usually takes a few hours to dry but when I do it in the evening the cloths are dry the next morning. I have a Gas dryer & it is $$ to use so I hope this year when they come to fill the gas I will not need the $400.00 full tank. My garage smells so good that I find myself wanting to sit @ the sewing machine & mend when the clothes are dry:).
Thanks for such a great Blog of so many fantastic frugal finds!
LikeLike
Cathleen,
Way to go! I love hearing what you’ve done and I do believe you live in an excellent spot for drying laundry outside. Very smart and I can’t wait to hear how much money you save. Please let me know the final bill next year! 🙂 There is nothing better than clean laundry dried on a line. Well, except a baby’s head!! Thanks, Cathleen, and much savings and enjoying life this year!
LikeLike
Hi. I am just seeing your blog for the first time. Thanks for taking the time to put all of this together! It is really beautiful. The question I have about drying laundry inside has to do with moisture. In a wet environment (such as in the Wilamette Valley, Oregon) do you find that the extra moisture in the basement has led to any issues with mold or mildew? I have heard that it can and so have been a little scared to try. But what is your experience?
LikeLike
Hi! Well, what the video show is all of my methods. I do dry my laundry for 10 minutes before hanging it up. It takes a lot of the moisture out and softens the towels – which can be hard and crunchy. Also, I leave the window cracked in my laundry room to get air (I have an extra safety lock on it). My laundry area is also next to the heater so we also have air from the heater around the laundry.
Yes, I am concerned about mildew and mold but I try to really monitor it. It’s definitely not a concern in the summer.
Thanks for asking…
LikeLike